This time I like to share my experiences how I could utilize files saved on my Azure Virtual Machine. My ultimate goal was to test can I access those with Azure Data Factory SSIS Integration Runtime without copying the files into Azure File Share. However I decided to start trying to access those files from my own workstation with map network drive method and not with remote desktop connection.
First I shared a folder on my Azure Virtual Machine. Then I started googling and found some instructions how I could connect my computer to Azure Virtual Network (VNet). I had to create so called point-to-site connection to my Azure (VNet). I had already my VNet in place and my virtual machine connected to it. VNet is type “new”, I don’t know what it is called officially, but not Classic one.
I started from creating a Gateway subnet into my VNet. You can create it by selecting first Subnets and then by clicking “Gateway subnet”.
Address range values are for internal use and you can freely define those. I entered 10.0.1.0/24, which gives me 256 addresses. I didn’t touch other configurations.
Next step was to create a new Azure resource called Virtual Network Gateway, which acts as a gateway between workstation(s) and Azure VNet.
Name you can choose freely, Gateway type should be VPN, I left VPN type as Route-based, which worked for me, for SKU I left the default value VpnGw1 (costs 0,1603 € per hour / 3,84 € per day). I think Basic (0,04 €per hour) would have been enough for me. It seems you can’t downgrade to Basic after creation, but upgrade is possible.
Then I chose my existing Virtual Network where I had created my Gateway subnet. Next I selected to create new Public IP address and I had to give a name for public address also. As a last step I chose the location, which should be the same as my VNet has. My Gateway was ready for now.
Azure uses certificates to authenticate Point-to-Site client connections. I created a self-signed certificate with Powershell, but it’s possible to use other certificates also. First I created self-signed root certificate and using it I created client certificate.
I used this script to create root certificate:
$cert = New-SelfSignedCertificate -Type Custom -KeySpec Signature `

-Subject "CN=KruthP2SRootCert" -KeyExportPolicy Exportable `

-HashAlgorithm sha256 -KeyLength 2048 `

-CertStoreLocation "Cert:\CurrentUser\My" -KeyUsageProperty Sign -KeyUsage CertSign
Note, these certificates are stored under user certificates on your computer, not under local computer certificates.
Client certificate I created using following script:
New-SelfSignedCertificate -Type Custom -DnsName KruthP2SChildCert -KeySpec Signature `

-Subject "CN=KruthP2SChildCert" -KeyExportPolicy Exportable `

-HashAlgorithm sha256 -KeyLength 2048 `

-CertStoreLocation "Cert:\CurrentUser\My" `

-Signer $cert -TextExtension @("2.5.29.37={text}1.3.6.1.5.5.7.3.2")
Next step was to export root certificate as .cer file, because I needed in my Gateway. First I opened certmgr program from my computer (Manage user certificates) and by right clicking I could choose “All tasks > Export”. Don’t export private key and select Base-64 encoded format. Then just choose a place on your hard drive where to store your .cer file. You don’t have to export client certificate unless you want to install it to other computers.
After that locate and open your .cer file with Notepad. Copy the text without first and last line, e.g. do not copy —–BEGIN CERTIFICATE—— line. You will need this in Azure Gateway configuration.
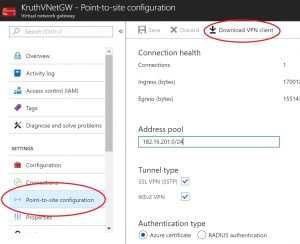
Open your Virtual Network Gateway resource and select “Configure now”. Select the address range for your address pool. This is again private address pool. Select both tunnel types just in case (apparently you don’t see tunnel types with Basic SKU). Authentication type should be “Azure certificate”.
Next you can finally use data you copied from your .cer file. Under “Root certificates” give your cert a name and paste content of .cer file (without those extra lines) to “Public certificate data”. Now your Gateway is good to go, but your client not yet.
You need to download VPN client (see image above) and install it to your computer. You download a zip package containing installation files for all different systems. E.g. I chose WindowsAmd64 folder from zip file and executed .exe file in there, because I have Windows 64 bit system. You can verify successful installation by navigating to Network settings on your computer and choose VPN or go directly to “Change virtual private networks (VPN)”. It should show your just installed VPN connection.
You still need to connect to that VPN each time separately, connection is not automatically on. However no passwords or userids are required, because certificates do the trick.
Now everything should be ready for your testing and you can try to map your shared Azure VM folder as a network drive on your computer. And here I stumbled. I tried to use my VMs public name and IP address and it didn’t work. It took me quite a while before I figured out, that I need to use VMs private IP address. You can find it from your VMs properties. It is given by your Azure VNet and is based on your VNet address space configuration.
Computer name I couldn’t use, because it requires customer-managed DNS server. I don’t have that and didn’t want to create one. Anyway I would do it, if there would a long term requirement to have that connection.
Next blog will be about accessing those files on my Azure VM from Azure Data Factory.


P.S. Remember to shut this VPN Gateway down after testing. I forgot to do that and it caused me some surprise expenses. Cost for me was 0,162 € per hour, in a month 115 €.